Home Chapter One Our Vegan Lifestyle Likes Comment-Free

Happy New Year

Thursday, December 31, 2009


This past year has gone by faster than any other chapter in our lives. I feel like I must have have ridden an escalator from January through August. I wasn't moving my feet, I was standing still, but somehow everything was rushing past me. Where has the time gone?

While 2009 was full of so many amazing things- watching my kids grow, getting in shape both mentally and physically, love filled visits from friends and family- we are really looking forward to 2010.

We've got a busy year ahead of us.

Christopher was supposed to retrain into a new job this year, but his training was cancelled. We were so looking forward to moving and creating a home for ourselves somewhere else, away from the trapping heat of Texas, so the change of plans was crushing. We believe that everything happens for a reason though...

This year we'll be credit card debt free. Something that we thought would never happen. We've made strict changes to our lifestyle, and we've stuck to them. Money is the root of all evil, isn't that what they say? Well, never again, not for us.

We'll be upgrading our car this year, from our trusty tracker, to a minivan. When we bought our car (back in 2006 before moving from Washington to Texas), we bought it with the intentions of having a family. However, we had no idea that we'd have Sasquatch children that would take up every bit of breathing space. Its time for something bigger, and better.

Christopher and I are running our first 4 mile event together this January. Neither of us have ever run 4 miles without stopping before, this will certainly be a challenge. We're going to train hard the next couple of weeks.

Christopher is going through ALS (Airman Leadership School) from January through March, as part of his Staff Sergeant training. He won't actually be promoted until the summertime though, the Air Force loves to make you wait around for things. We're very proud of him.

This year I'm going to learn how to sew. Its been in the back of my wants for awhile now, and with all of my accomplishments in 2009, I have no doubt that if I put my mind to it, I can sew a straight line. We'll see how that goes!

2010 is going to keep us on the tip of our toes, that's for sure. I can't wait to watch our future unfold.

Oh, and there is one other thing, but, we can't let the cat out of the bag just yet. Stay tuned?

Anyways, Happy New Year!

Ornament #8: Megan from Lemonade

Wednesday, December 30, 2009

This ornament, number 8 out of 9, came in a week ago, but I simply haven't had the time to share it! As you can see, the Christmas posts and stories will be coming for quite a while after the holiday has officially been over, because there just isn't enough time to tell you about all of the things that I want to tell you about!


A cute little mug of hot chocolate. I love it. It looks great on the tree, and is unlike any ornament that we have. Thank you Megan, its wonderful.

Unexpected Ornaments

Tuesday, December 29, 2009

My 3 year old daughter has a pen pal, I might have mentioned this once before? Well her pen pal's mom (Vanessa) and I chat every so often, read each others blogs, tweet at each other on Twitter, things like that. A week or so ago, we got a nice package in the mail from their family, it was a very pleasant surprise.

After having a bah-humbug sort of day, I decided to open the gift that she had sent early. I had originally planned on waiting until Christmas, they had all been nicely set under the tree, but I needed the pick me up, and there they were.


Inside the package were a set of beautifully handmade personalized matching ornaments for the entire family.

Thank you Vanessa!
We love them.

Ornament #7: Oh Hello Friend

Monday, December 28, 2009


Another beautiful ornament has found its way onto our tree. Danni from Oh Hello Friend, made me this house out of felt, with a silver heart reading "T & C" (for Tia and Christopher) hanging above the little red door. Very cute. Thank you, Danni!

A Visit With Grammy And Grandpa

Sunday, December 27, 2009

Hands down, the most active family members in our children's lives, are my grandparents. They've given so much love and support, that it often overwhelms me. Eleanore is constantly getting letters in the mail, just little notes reminding her how special she is, and books and clothes are always arriving at our door for reasons none other than "we love you". The love that they give us warms my heart.

A few weeks ago, I noticed an email in my inbox, with the subject line "Lets make this short: Can we come visit?". I nearly fell out of my seat. YES! Yes you can come visit!

Eleanore would finally get to meet the face behind all of the handwritten cards that she had gotten. We counted down the days.

On Thursday night, on the 17th, after the kids were in bed and Christopher was relaxing on the couch watching some football, I headed off for the airport to greet them with hugs and candy canes. They looked, great.


We spent the next 3 days going through memories, filling plates with turkey and stuffing, nibbling peppermint bark and rum balls, filling our glasses with nog, and enjoying our time together. Watching my Grammy play in my daughters pretend kitchen with her brought back so many memories of my own childhood, when she would play with me. It was wonderful.


They colored. They baked cookies for Santa. They read stories.


Charlie is going through a phase where he doesn't want to be touched by anybody other than me or Christopher, so they spent a lot of time playing peek a boo with him from a distance. There weren't many opportunities for photos when it came to the little grump. Not unless we wanted a picture of him screaming, haha.


We took them to the air park while they were here. It was sunny and warm, but windy. Grammy and I hid our hair behind the hoods of our jackets, the boys talked air planes, Eleanore ran around in the open space, and Charlie screamed. He screamed a lot.

Right before they left, we took another trip to the North Pole. Charlie needed to meet Santa! Eleanore rode in their car with them, while Charlie slept in the backseat of ours, and when we arrived there, the heartbreak of knowing that they'd be leaving in just a few short minutes settled in. Before we said our final goodbyes, we asked a nice couple who was waiting in line, to take our picture. And it turned out just perfect...


We couldn't have asked for a better visit.

Week 22

Friday, December 25, 2009


This weeks flashback is going to be a little bit different. Usually I scan an old image of myself, and then write a little story to go with it. But this week, while most everyone else in the world is focusing on Christmas, the only thing that seems fitting for me, is to go back into the archives, and re post an entry that I wrote for my son, after he was born.

Tomorrow my baby boy turns 1 year old. Can you believe that?

It amazes me. As I write this, little Charlie is sitting in his high chair to the left of me, feeding himself little bits of turkey and and cheese, screaming at his Daddy for pain medicine to help numb the throbbing in his gums. Every day with Charlie is an adventure. Hes had a rocky start, overcoming both the swine flu and pneumonia, surviving everything that his big sister has thrown his way, and before I know it we'll be saying happy birthday to him again, not even having had a chance to soak up what we experienced in 2010.

Anyways. Here is the post that I wrote (without editing) shortly after he was born last year, introducing him to all of you...


--------------------------------------------------

How can I put into type how much I love my son? I can't even get over the fact that I just wrote the word "son". I had to look at the keyboard to make sure I was spelling it right. One of my best friends, Miss Kristen, picked me up at 8am, and after a quick picture party in her car, we were on our way to Abilene Regional to have a baby. The plan was for Christopher, my mother, and my precious Elie Sue to meet up with us there around 11:00, an hour before my scheduled c-section. When Kristen and I got there, they asked me "are you here for your c-section?". I answered with a yes, even though I was only there for blood work, and my surgery wasn't for another 4 hours. Even when the nurse said "get undressed, we'll get your iv hooked up, and then we'll take you back and have a baby!", I still wasn't in tune with the idea that it might be happening much sooner than I expected. And then I get a funny phone call, from Christopher? Hes at home, and he says "guess who just called me?". I don't know, who. "Labor and delivery". Really, why? "They're ready to do your c-section now". Oh OK. Wait... right now?


Then before I know it, Christopher is in front of me putting on scrubs, I've got an iv in my wrist, and I'm holding a shot of what I can only describe as grape vomit that I'm supposed to drink in order to prevent my lungs from burning if I throw up during the surgery. I managed to get away with not drinking it last time, but this time I put on my big girl panties and went through with it. All eyes were on me as I struggled in silence for 5 minutes following, trying my best to keep it down. And then with a handful of tubes and wires, I was wheeled down to the operating room of doom, where I'd feel every second of my spinal, and nearly pass out from the extreme nausea and lung tightening once it took effect. I don't know what I would have done without Christopher. He was my rock through all of it. Usually they don't let the husband in the room during the spinal, according to a baby story at least, but he was there right in front of me, reminding me to breathe the entire time. He commented multiple times on the ridiculous amount of sweat pouring off of my body, but other than that, he was amazing. Thank you honey, I would have died if you hadn't been there. All of it was worth it though, when they finally announced that his head (covered in hair) was finally out, shortly followed by the final call of "Its a boy!".


They held him up over the blue curtain for me to see, and I cried uncontrollably until he left the room with Christopher and the nurses. I don't remember much after that. I closed my eyes and replayed that very moment in my head over and over again for the next hour until he was finally in my arms. I'm in love. Charles Vincent was born on December 26th, at 10:15 am, 20 inches long, 7 pounds 10 ounces. And hes absolutely one hundred percent, perfect.


--------------------------------------------------------
If you have a flashback that you'd like to share with us, add your link to the list below. Make sure to post the link to this post in your blog as well. The more the merrier!

Baby's First Christmas- size 24m

Thursday, December 24, 2009


Have you ever looked for something that says "Baby's First Christmas" in a size 24 months? It is impossible to find. I looked, and I looked, and I looked. I was "watching" a couple of items over on ebay, but they weren't anything I was willing to pay over $5 for (I'm sure you know how that goes). I searched high and low on Etsy, but we all know etsy isn't cheap, I'm not paying $20 for something that my over sized baby will wear just twice.

While looking through the assorted handmade selections though, I came across a stamp style customizable iron on by maddieclaire, and I knew it would be my only change at having something special for Charlie to wear. So I bought it.

While out and about shopping with my Grammy, who was here for a brief 3 day visit (much more on that later), we looked for a plain white onesie, again, in size 24 months. Have you ever tried to find one of those? Its just as hard to find a boring colorless piece of fabric, as it is finding the "Baby's First Christmas" one. Its like treasure hunting.

Well my Grammy suggested that we try looking at ROSS. I think I've been into the ROSS here maybe once, a few years ago while shopping for Eleanore. I'm not a regular, mostly because I don't usually shop for things other than groceries, but I thought "we're right here, why not, lets pop in and see what we can find".

Well hot dog! Right there, at eye level, were multiple packages of white onesies (exactly what we needed), size 24 months, only $3.50 each.

My Grammy is a genius.

Let the Baby's First Christmas onesie making begin!


I'm no good with and iron, I think I've said this before? I hate the smell, I hate the heat, I hate how I think I'm going to fry a triangle shape into my skin every time I'm around one... I hate ironing. My Grammy however, stepped right up to the plate, more than willing, and made Charlie a onesie.


And while we hit a couple of bumps along the way, things not wanting to stick the way that they should and such, the end result came out looking pretty much perfect.

Now quick, before he gets food on it, take it off of him and hide it in a plastic bubble.

Gift Exchange

Wednesday, December 23, 2009

I love gift exchanges (as if I haven't made it obvious enough, hee hee). Well another swap that I got involved with this holiday season, was a blogger gift exchange, hosted by Pickles On Pizza. The way that this swap worked, was you were assigned a partner, but they weren't assigned back to you. I was assigned Christina, from Consider The Coffee (I made her a recipe card glitter wall plaque, like the ones I made in that tutorial, remember?), and... wait... who was assigned to me again?

To be honest, with everything that I had going on, I had completely forgot that I should be getting something back! A few days ago I got an email from the gal that was assigned to me, saying that she had gotten overwhelmed with to-do's, which I understand completely, my to do list is 20 miles long, and that she wouldn't be able to send my package until after Christmas. Ok, no problem.

And then yesterday, this comes in the mail...


A beautiful necklace from Christina's shop, my partner, the one I made the plaque for. She said it was from Angela, the host of the entire swap event.

Are you confused too?

Turns out, my partner, the one that had emailed me saying she wouldn't get my gift out until later, had maybe accidentally mailed my gift, the one intended for me, back to the same girl that had sent her a gift. And Angela, the host of all the confusion (if you're following along, I applaud you, because even I've confused myself while trying to organize this into more than just thought), didn't want me to go without a gift.

Well thank you Angela. Your wonderful surprise package made my day.

Ornament #6: jessicajane

Tuesday, December 22, 2009


The second half of my ornaments have slowly been working their way into my mailbox. Number six in the swap series, came from jessicajane (a very good friend of mine, who no doubt spent a lot of time on this miniature piece of art).

Not only did she make me a gorgeous little decoration, but she went out of her way, and made them for my kids as well. Jessica has met both of my kids in person, shes no stranger to their chubby cheeks, and they remember her well. Ok, the 3 year old does, at least. She knew exactly who I was talking about when I said "red haired lady with the fluffy white cat".

Look at how amazing these turned out...


For Eleanore, a purple sparkly dress on a hanger, accented with her name and the year. Personalized ornaments are so special. I'm sure that Eleanore will treasure this for the rest of her life.


And for Charlie, an airplane, just like the one his Daddy works on. The absolute perfect first ornament for him.

Thank you so much Jessica.
We love them.

Ornament #5: My Twitter Friend Tina!

Monday, December 21, 2009


Number 5, out of my series of 9, was a complete surprise. My Twitter friend, @Tina2967 (I kinda geek'd out just now) and I, swapped cards this year. Only, she didn't just send me a card, she surprised me with a delicious smelling, adorably decorated, padded envelope full of awesome! Along with her very sweet and thoughtful card, was a handmade cinnamon stick Santa Clause. Eleanore hung him on the tree right away, she couldn't wait even one second, and then entertained herself with the stickers that had come on the card envelope for at least half an hour. Thank you Tina! For both your beautiful and thoughtful gift, and for keeping my daughter out of my hair long enough for me to write this blog entry, haha.

7 Layer Peppermint Bark

Saturday, December 19, 2009


A few years ago I didn't even know what bark was. I had heard its name chimed from the midst of conversations that didn't belong to me, but I had no interest in further investigating. It was this year, that I finally decided to see what all the fuss was about.

Have you ever looked up the recipe for peppermint bark? "Melt white chocolate, crush candy canes, sprinkle on top". ...Yeah, that's it. *Yawn*, boooooring.

I desire complication. Give me texture, I say!

So without even attempting the simple bark that everyone raves about, I assigned myself the task of creating the greatest bark of all time. I would make, a seven layer bark.


You will need:
-white chocolate, about 2 cups, divided in half.
-regular chocolate, about 2 1/4 cups. Divide into 3 sections. 1 cup, 1 cup, and 1/4 cup.
-peppermint extract. about 2 1/2 tsp- ish. you might want less than this. your call.
-candy canes. its up to you how many. i grabbed the biggest handful of mini candy canes that i could get.
-2 large glass bowls for melting.
-a blender, or zip lock bag. or both.
-wax paper. 3-5 large sheets.

Before you start, clear off a large space on your counter top. This bark isn't made on a cookie sheet like most barks. Cover your counter top with wax paper.

Lets make magic happen...


Gather your candy canes. Un wrap them.


If you have a blender, load them up. Turn blender onto the lowest setting. This will grind them up into different size pieces. You'll want a good amount of candy cane powder, and a good amount of chunky pieces.

If you do not have a blender, grab a zip lock bag, put your candy canes inside, and pound on them with a hard object. I used a jar.


Now, you want to separate the powder from the pieces. I did this in a regular ol' kitchen strainer.

If the bigger pieces aren't quite small enough, use the zip lock method to pound them down to the size you're looking for.

Set the candy cane pieces and powder aside in separate bowls. You'll be using the powder before the pieces, so have that within close reach.


Put half of your white chocolate into a bowl (might as well get the other chocolate ready in its bowl at the same time), along with 1/2 tsp peppermint extract. Melt it in the microwave. You can melt this on the stove if you choose to, but its so much easier (and quicker) to just follow the directions and use the microwave.


After your first bowl of white chocolate is melted, hurry over to the wax paper, and pour it down, smoothing it out with the back of a spoon. Work quickly, because it will begin to thicken faster than you're probably anticipating. It doesn't have to look perfect, lumps and bumps are ok. Just try to get it as thin as you think it will safely go.

Let it dry completely. Walk away, do something, come back in about 15 minutes.


After your white chocolate has dried completely, its time to add a layer of brown chocolate. Melt about a cup of brown chocolate, with 1/2 tsp peppermint. After its been melted, pour it over the top of the white chocolate.

Now, as you might have already guessed, this is going to melt the white chocolate. So you need to work fast, with as little swirls of the spoon as possible. Spread it out evenly over the white chocolate, pushing it out as far to the edges as possible.

Before this layer dries, grab your candy cane dust, and sprinkle it over the top.

Again, walk away, do something, come back in 15 minutes or so. You want it to dry as much as possible. The thicker we go with the layers, the longer its going to take to dry.


For the 4th layer, melt your other cup of brown chocolate, along with another 1/2 teaspoon of peppermint. Pour it over the top.

Smoothing it out will be tricky, because of the candy cane dust underneath, but you can do it! Its ok that it looks bumpy. Its supposed to.

Let it dry.


Alright. We're getting close to the end here.

Melt the remainder of your white chocolate, with more peppermint.

Pour it over the top. Smooth it out.

Shake on all the rest of your candy cane pieces. Tap them into place with your fingers. Its starting to look so pretty!


Melt the remainder of your brown chocolate, don't forget to put in a splash more of peppermint, and then drizzle it over the top!

You all know how to drizzle chocolate, right? Dip it, and then kinda do a flick of the wrist type motion?

Are you drooling yet??

...ok, well you can't touch it for awhile. That's 7 layers of warm sugar... it needs to cool. And even after its cooled on the counter completely, it will still be very soft.


Don't even think about picking this bark up and dropping it to break it into pieces that way. That method won't work. You'll need to bring out the big guns for this stuff.

Or, a pizza cutter.

Cut your bark into various square sizes.

Carefully with a spatula, piece by piece, take your time, remove each square, and put it onto a lined baking sheet. Put baking sheets into the fridge to cool completely.

Your end result should look something like this...


Mmm. So good.

So there you have it. Now honestly, do you think you can ever go back to plain ol' 2 layer bark ever again?

Week 21

Friday, December 18, 2009


This picture means so much to me. It was taken when I was around 8 months old, on my very first Christmas. 1984. So many little things from this photo stand out in my mind. The cabinet behind us, I remember it well. The photo hanging on the wall in the other room, I could almost touch it in my memories, that's how real it is. And of course, the love that my dad and I share.


I've set this photo in the tree like an ornament, and every time I walk past it my eyes fill with tears of Christmas joy.

I can't wait to spend this Christmas with my dad. In just one week, he'll be holding my babies the exact same way that he held me.

-----------------------------
Do you have a flashback to share? Add your link to the list below, and let the fun begin! Flickr, Blogger, Facebook, LiveJournal- whatever you've got. Make sure to put the link to this post somewhere in your post, so our weekly trip down memory lane can grow more and more...

Ornament #4- Allison Sattinger

Thursday, December 17, 2009


Ornament number 4, from my various ornament swaps this year, is a simple silver ring, strung up on a plain piece of tan string. Allison said that when she was younger, her most beloved ornament was a velvet circle, 80 years old, worn out with love. So in homage of that, she made silver hoops for all of us, and sent it along with her very sweet story. I love it, thanks Allison!

Ornament #3: Sew Lola

Wednesday, December 16, 2009


This pretty little pincushion style strawberry was made by hand and sent to me from the talented Sew Lola. The perfect addition to our ornament family.

Thank you Lola! Its perfect.

Girls Night Out at the North Pole

Tuesday, December 15, 2009

Our house is perfectly even in the gender department. Two boys, and two girls. Something that I don't do nearly enough, is have girls nights. Not the kind of girls nights out where you grab your lady friends and go off to the movies or a bar (I don't have enough of those either, but-), the kind of girls nights with just me, and my Elie.

A girls night out was long overdue. Elie got all dressed up in her stylish Christmas outfit, and we met up with our good friend Kristen at the visitors center. While we went with her, the boys went Christmas shopping (only to return home later, completely empty handed). Our first stop was Starbucks. A peppermint latte for me, and a hot chocolate for the little lady. Seeing Eleanore out of her element and in the company of a missed friend, was just what I needed to kick any little last bit of Scrooge out of my system. She was being, an angel, singing along to the fancy melodies that were playing over the loud speaker, and climbing about in the overstuffed chair that she was sitting in.

Our next stop... was the North Pole.

Yep. The, North Pole.


We drove through a long course of beautiful displays and lights, and then went inside to see the big guy with the beard. As soon as we entered the room, Eleanore shouted "ITS SANTA", which was quite the opposite of last years reaction. All eyes turned to us, as she jumped up and down and pointed, nearly pushing her way to the head of the line to meet him. We waited not so patiently until it was our turn, and then when standing beside him- she froze. I'm pretty sure he asked her what she wanted for Christmas, although I couldn't hear what he was whispering, since I was standing back with the camera, but she was too busy sucking on her lollipop and looking off at the fake presents that she was sure were for her.

After our visit with Santa, we got to walk around and see the elves, reindeer, penguins, and other winter wonderland friends that were lining the walls of the room. The only thing missing from our perfect trip, was baby brother Charlie. But then it wouldn't have been a girls night, would it? So we made a promise to go back again next week, when Grammy and Gpa are in town, and this time we'll bring the boys along with us.

A Christmas Tree Ornament Tutorial

Monday, December 14, 2009


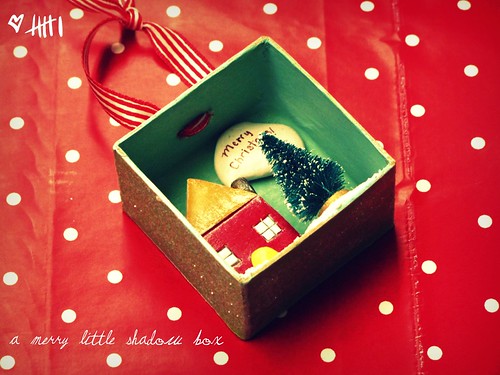
Now that most of my swap partners, if not all of them, have gotten their ornaments in the mail, I can finally share the finished products with all of you!

I came up with the idea to make these, after making a glitter painting for my friend Jessica. A lot of you had asked me in the comments section of that post, how I did it. I know it sounds complicated, a giant painting made out of nothing but glitter, but its simple really. Glue + glitter. That's it. I had actually seen it done in an issue of Martha Stewart magazine, and wanted to see what I could bring to the project. The end result of that project, inspired me to create this project. And now I've got a tutorial to share with you, in case you'd like to make some of your own!
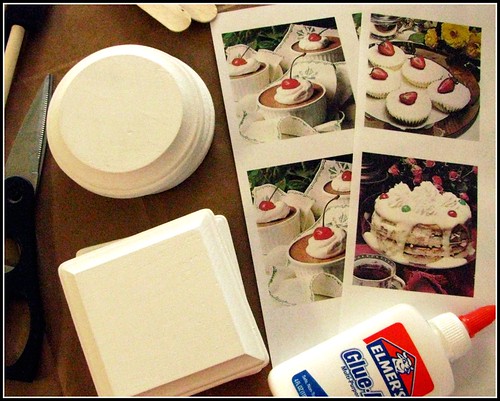
You Will Need:
-small wooden plaques
-craft paint
-sponge brush or paint brush
-brown paper bag, cut open and used as a place mat
-printed out image, approx 3 1/4" x 3 1/4"
-craft glue
-scissors
-popsicle stick
-eye hooks
-ribbon
-glitter
-paint brush
-a blank sheet of paper
-small glass of water

Lets get started?


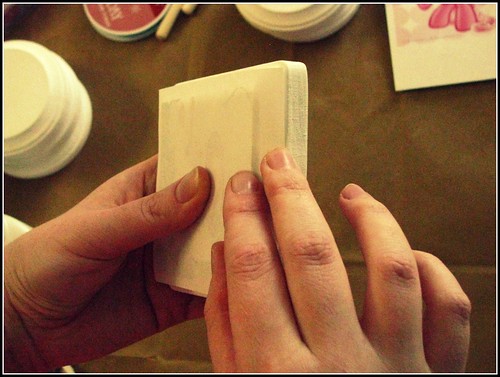
First, you'll need to sand down any rough edges on your wooden ornaments. Put down a brown paper bag as your work space, paint your plaques. I chose white paint, and I did 2 coats.

For your image, you can use either pictures printed from your computer, magazine clippings, whatever you want.

I used recipe cards that belonged to my great grandmother, scanned them into the computer, re sized them, and then printed them out. At first I was going to use the real thing, but just couldn't bring myself to cut into them.


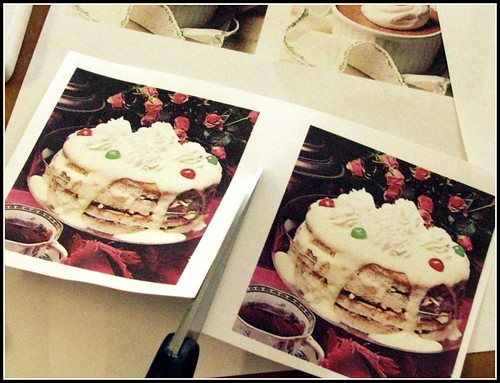
Get your images ready. If you printed them out on a sheet, its time to cut them out.


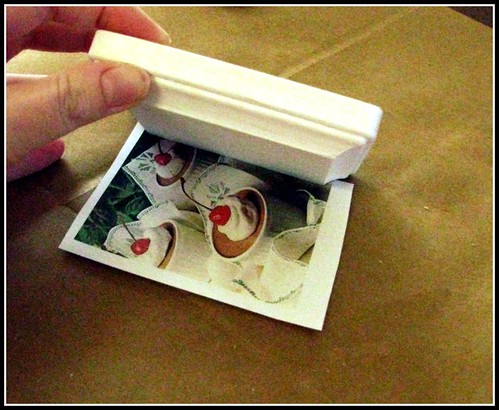
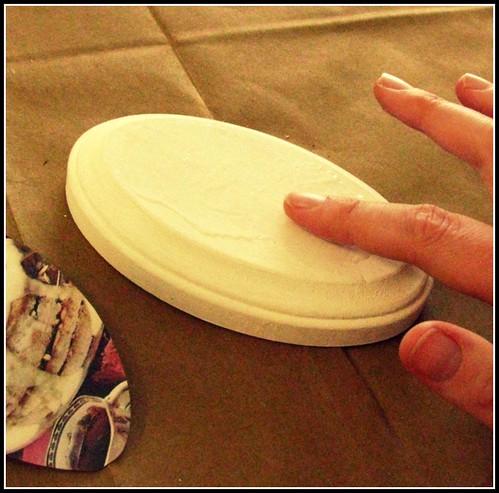
Put your image down on your work surface, picture side facing up. Position your plaque down on your image, exactly where you're going to want it to be when all is said and done. Make sure that its lined up so that all of the colored area is on the plaque, etc etc...


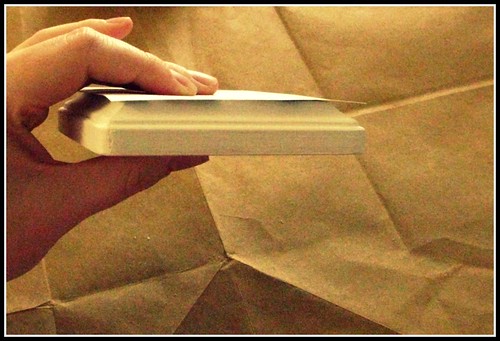
Now very carefully, pick up both the plaque, and the paper, and hold it in one hand. Make sure you have a good grip on it.


Holding the plaque firmly in one hand (your left hand, probably), you're going to crease it using your other hand. Take your right thumb and index finger, bring them to a pinch, and crease right along the edges, all the way around.


See, like that. You want to do that on all sides of the paper. And its easier to see your crease, if you do it image side down.

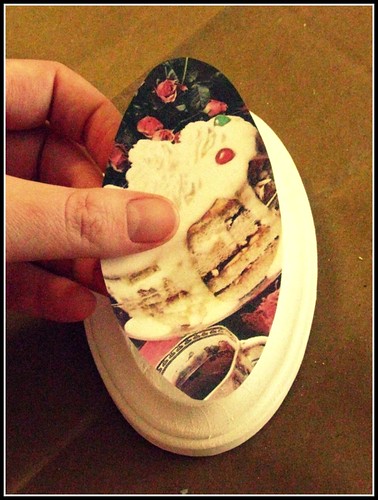
After your paper is all creased up, cut it out with your scissors, along the inside of the crease. Set the cut out image down on your plaque, and make sure that it fits. You might have to trim it to make a few slight adjustments, and don't worry about wobbly edges, nobody will notice.


Get your glue ready. Do a little zig a zig (ah).

Spice Girls, anybody? ...sorry.


Quickly, before it dries, take your finger and smear it around, smoothing it out. I wear a craft apron, so that I can just wipe my sticky finger on myself, but if you don't have one (seriously, ugly aprons are like 25 cents at goodwill, get yourself one), then you can use a hand towel or something


Put your image on. Don't rub too hard, or you'll cause the paper to wrinkle. Another thing that might cause it to wrinkle, is too much glue. This is where your popsicle stick comes in handy. Just take it, and scrape it along the picture, and smooth it out.

Now the fun part...


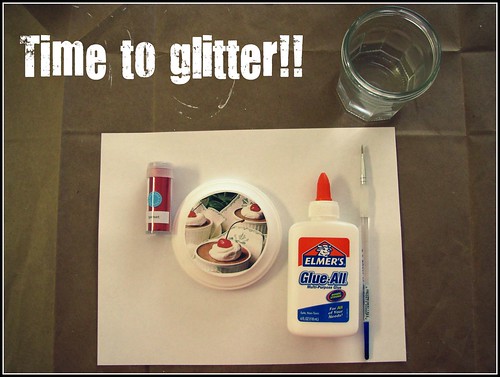
Put your blank piece of paper down, and set your ornament on top (later on, you're going to use that paper to pour all of your glitter back into the bottle. Make sure to do this inbetween colors). Get your glitter ready. Get your paint brush. Put a little bit of water in a glass, to dip your sticky paint brush in from time to time, so that it doesn't get too stiff.


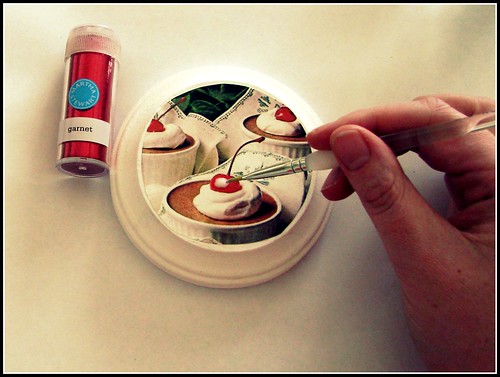
Dip your brush in glue, and dab it wherever you want the glitter to stick. Adjust your brush size to the area of space that you'll be glittering. I used a smaller brush, for more accurate and detailed glittering.


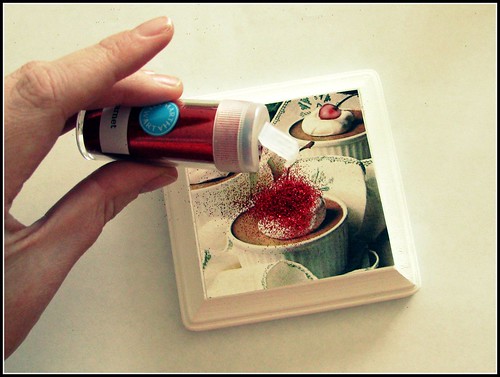
Tap, tap, tap on some glitter.


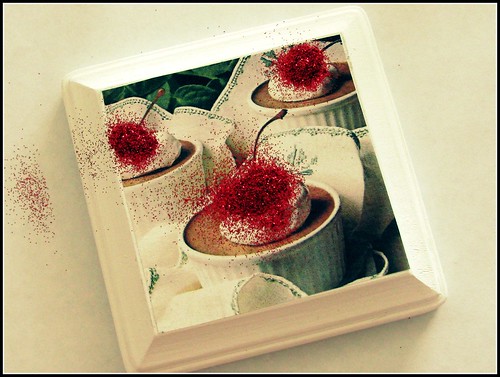
It should look something like that. Messy little piles of sparkle.


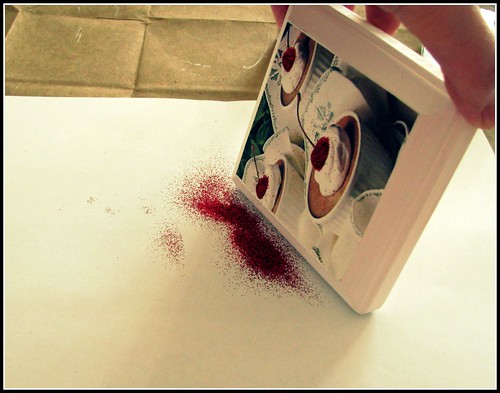
And now tap, tap, tap the glitter right off.


Now take your ribbon, and wrap it around the ornament. Cut it at the overlap.


Line the edges of the ornament in glue. Put on your ribbon, making sure the overlap happens on the under side. It looks prettier this way :)


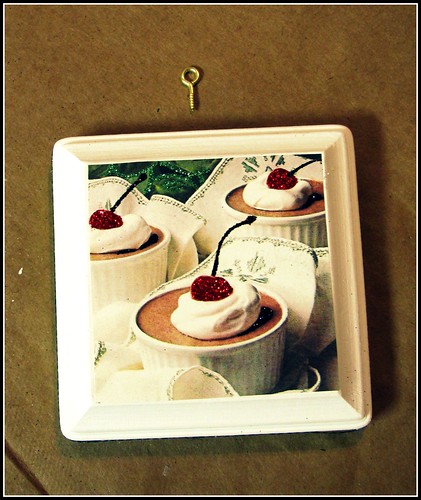
After that's all dry, take one of your eye hooks, position it somewhere near the middle on the top, stab it through the ribbon, and screw it in. Sometimes this is easy, sometimes its hard. I've never had one not work though.


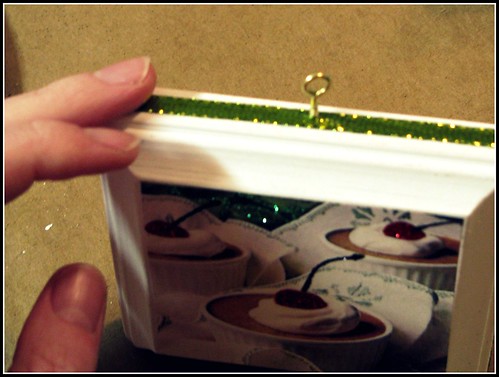
See, there. Like that.

Now cut another piece of matching ribbon, and string it up!!


Or if you want, you can get a little thing like this, that you hammer into the back, to turn it into a wall hanging!


I lined a baking sheet with tin foil, set all of my ornaments down, and then sent them out into the garage with my husband to get sprayed with a misting of clear coat. That way most of the glitter stays on the ornaments, as opposed to your floor, haha.

And ooh lah lah, don't they look pretty?

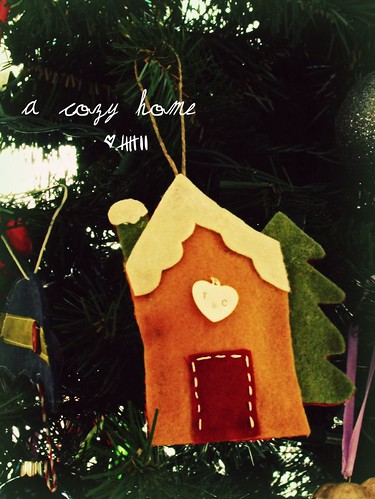
Here is another example of an ornament you can make this way...


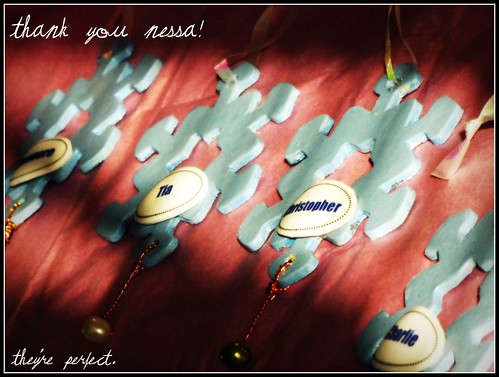
Eleanore and I made pony ornaments for her and her friends.

Ta-da! Some homemade Christmas tree ornaments.